
Updated: Electrical System Design – Part 1: Solar
Originally published on June 1, 2015
As a mechanical engineer, most of the Toaster’s systems were straightforward for me to learn about, design, and build. The structure, interior, and plumbing are similar to residential home construction, and required (mostly) common materials and tools. But the electrical work was a major challenge. I know the basics of electricity, but have never really liked working with it – it’s hard for me to trust things I can’t see…
The Toaster’s electrical system can be divided in two parts: What I call the “load” side starts at the distribution panel and is comprised of the 12V DC and 120V AC circuits and devices. Every device we use, from the AC outlets and lights to the water pump and trailer landing legs, is here. Some of the controls are tricky, but the load side is not generally tough: The AC stuff is done (almost) just like residential, and DC wiring is pretty intuitive.
The other half – the “solar” part of the system – took a lot of research. Luckily for me, there are some excellent resources and folks willing to share their expertise online. Here, I’d like to describe what the “solar” part of our system looks like, and (some) of the reasons for that.
Predictable disclaimer: I’m not a professional or certified electrical-anything. The terminology, symbols, etc. that I use probably fly in the face of established industry standards. My design is based on an honest attempt to be robust and safe, but should not be presumed correct. If you use anything I’ve done here please do your own research!
Also, it’s dreadfully technical and boring. Get yourself a coffee…or a beer.
Updates May 2018 are in bold
The basics
…are already covered pretty well online – that’s where I learned them! Going off-grid is not rocket science…but neither is it child’s play. It’s impossible to even discuss useful details unless everybody already knows the fundamentals. To that end, the sites below have great explanations of the terms, core principles, and installation of RV solar, like explanations of Volts, Amps, Watts, Amp-hours and Watt-hours. I don’t think I can do better than others already have. Please check out these sites so you’re familiar with the lingo:
Actual installs and more techy details:
Concepts and Terms:
RV solar is not new and there are lots of resources for putting a couple affordable 12V panels onto an RV (usually no more than 400W total). Many full-time boondockers rely on their computers, TVs, water pumps, and other accessories to be powered by solar panels, and they have 2 - 4 batteries on board to ensure many days of autonomy (available electricity reserve for when solar recharging is impossible due to rain or overcast). But their propane tanks shoulder the much larger loads of heating, refrigeration, and hot water. Our rig’s loads are closer to a small off-grid cabin, since we eschewed propane. Things get more complex as your system scales up, and each component must be considered in conjunction with the others for a safe system that operates as expected. HandyBob’s site is the only resource I found for putting serious solar onto an RV. He’s cranky…which honestly makes me like him more (I have been accused of crankiness many times), and his posts get pretty, uh, angry (I have also been accused of angriness). But the dude has lived and worked with lot of this equipment and is “walking the talk”. If you're going to actually do this, deal with the attitude and learn from him. Although I’m pretty sure he still uses some propane, he is not using a generator. He is all about quality, reliability, robustness, value, and safety. I followed all his recommendations (except one) and have zero regrets.
Generally, the first thing you'll do is size your system. Starting with your expected use of all electrical devices, you estimate daily requirements, then set about applying dozens of multipliers to account for efficiencies, depth of discharge, actual vs. ideal solar insolation, days of autonomy, etc. From there you can figure out two of the main numbers you need – Watts of PV on the roof, and Ah of battery capacity. I did all that – in an eye-chart of a spreadsheet that I’m quite proud of (6 tabs)…but in the end, it came down to cramming as many Watts and Ah into the available space as possible, and hoping it’d be enough.
Here’s a basic diagram of our system
(If you're wondering why the boxes are badly-placed and the lines are crooked: It's because the full wiring diagram looks like this)

… no, I’m not going to let you enlarge that, because it’s an embarrassing mess. Maybe another post, after I’ve cleaned it up.
We bought all these components – except the batteries – from Wil at Wholesalesolar. He was super helpful in getting the order put together and both bringing up, and answering, last-minute questions! Now let’s talk about each component in more detail:
Array (Astronergy CHSM6612P)
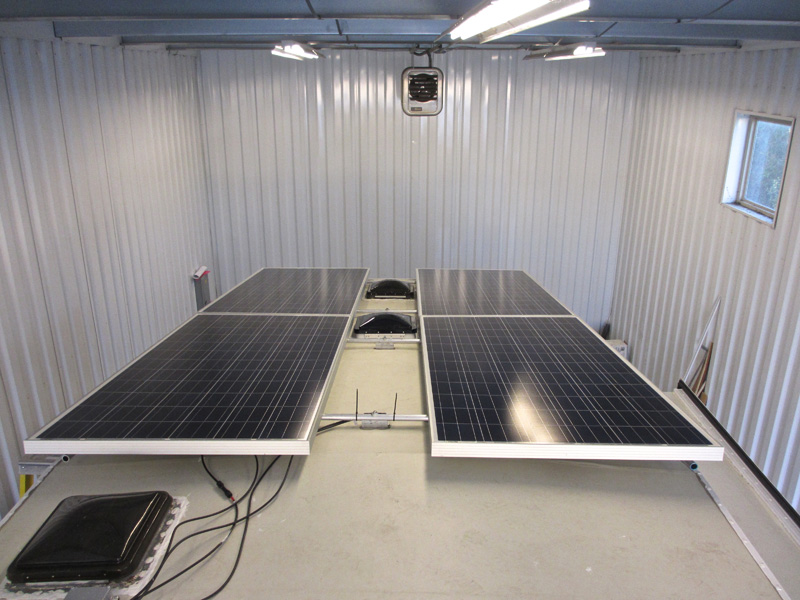
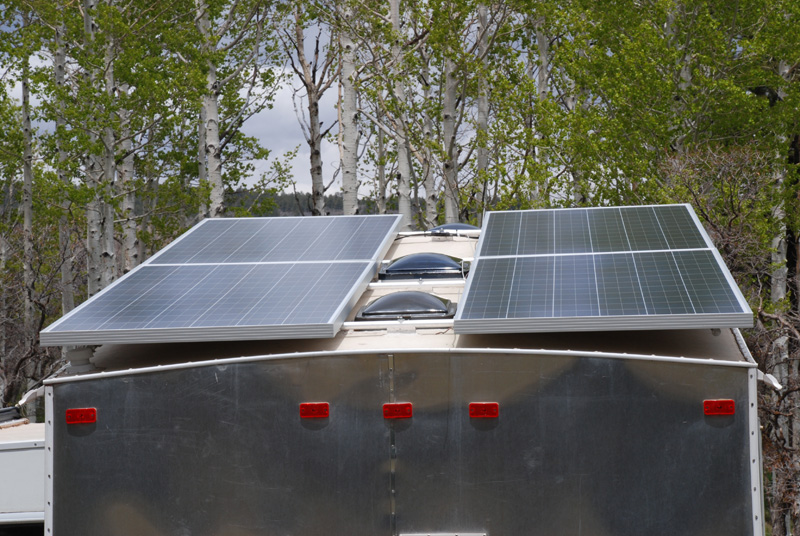
Each of the panels on our roof is a 305-Watt, 24V (sometimes called “grid-tie”) polycrystalline panel, although the rated (ideal conditions) output is nearly 36V. The array is wired in two parallel strings of two, making it 48V nominal. I did this for a few reasons:
MPPT-type charge controllers can yield higher efficiency with higher voltage PV input.
I thought that wiring all 4 in series for a 96V array would have made the array too susceptible to partial shading, but I was kinda wrong about that. Even a tiny shadow on a solar panel will reduce its output dramatically. Small leaves or bird poo can cut it in half. Something like an A/C shroud cover casting a 6” shadow will effectively “switch off” that panel. The good news is that modern panels employ bypass diodes so when some cells – or a whole panel – are shaded, they don’t shut down the entire array. Some folks get bent about wiring panels in parallel or series to deal with shadows…I’m here to tell you this: Wire the panels so they pair well with your charge controller and cable sizing needs. And lay them out so there are NO shadows. If shading does happen due to outside factors like trees, light poles, etc. You can be assured that any panels which are not shaded will still be pulling their weight. So this original reason of mine was misguided.
However, one nice thing about having two series strings is they can be switched separately. So if I needed to work on one pair of panels, I could take it offline and still have half-power coming into the Toaster.
Also, with a 48V array, I was able to use standard 10awg leads without exceeding safe currents in the conductors. A 24V array would have output double the current and I’d have been stuck running either twice as many leads down from the roof (cost and space), or creating heavier-gauge leads (cost). Not to mention, routing leads heavier than 10awg in our cramped basement and disconnect panel would have been nearly impossible. It was hard enough as it was.
Putting all 4 in parallel for a 24V array wouldn’t have let us take full advantage of the MPPT charge controller in low light. Since our array is at a fixed angle – and far too shallow of an angle for anywhere in the contiguous US, most of our charging is done well below rated voltage. With a 24V array, once voltage drops below 13.7V (38% of rated), we can’t push any more current into the batteries. But at 48V, we can go way down to 19% of rated Voltage and still make juice. This means that even on overcast days, or during dawn/twilight, we still see a few hundred watts, which is pretty awesome for us!
Polycrystalline panels aren’t as efficient as monocrystalline, but for $1/Watt, the price was right! Also, the dimensions of these panels worked out to just barely fit on our roof without overhanging, and still allow an “aisle” down the middle for our vents.
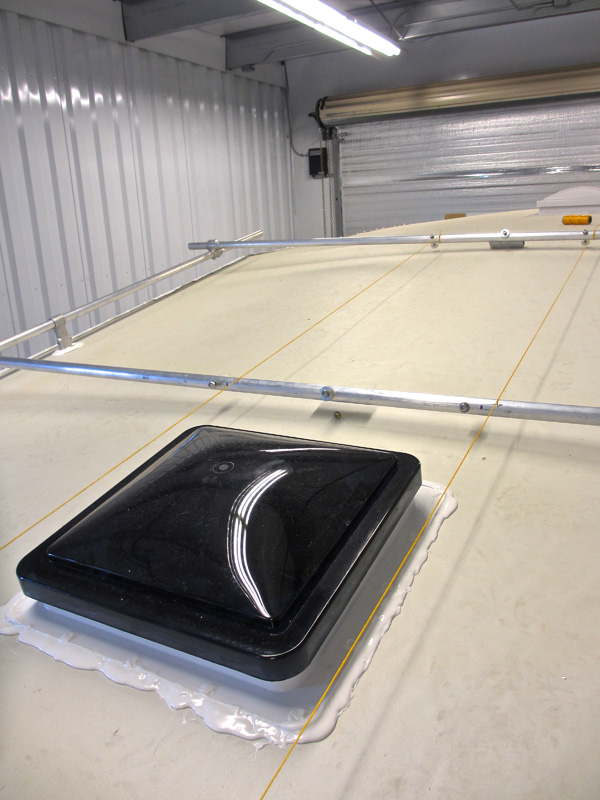
The panels are fixed to our roof on an aluminum rack we built. Since the roof has a lot of curvature, and the panels only barely fit the roof anyway, mounting them to a rack was the simplest option. It is admittedly not low-profile but seriously, 1200W of panels isn't going to go unnoticed, no matter what. A benefit of the "ugly" rack is that we get loads of air behind the panels, which ought to keep them a bit cooler and more efficient. Each panel is 54lbs. and the rack weighed about 28 lbs. Including hardware and leads, the whole shebang is around 236lbs. on the roof. Each of the rack’s 6 feet are secured to the roof with 2” long SS wood screws. There is butyl tape between the foot and the roof membrane, and Dicor lap sealant all over the top of the foot. When we were rebuilding the roof, we added blocks of 2x6 lumber, braced between the rafters, which are what those feet are anchored into. Without that blocking, a lot more feet (with shorter screws) would have been necessary!
Charge controller (MidniteSolar Classic 150 Lite)
Charge controller (left, black) and disconnect box (right, white). That's the greywater vent pipe in front. The diagonal segment can be removed for access to the breaker box..
Once I read about MPPT controllers on HandyBob’s site, it was clear we would do well to get one. I was also grateful to take his recommendations on brand: At the time, it was either Morningstar or a MidniteSolar controller. I liked Morningstar best so I called them first, but the configuration of our array was just a bit outside their recommended parameters for a single TriStar (TS-MPPT-60). Lacking the space for two controllers of any sort, I talked to MidniteSolar and they said a single Classic 150 Lite would do the job. I thought the marketing / logo was a little weird but whatever, it’s solar kit, not a sports car… There are a lot of details to worry about with a charge controller – I thought I had it sorted out but had missed a few – so I’d suggest always checking with the manufacturer when spec’ing one out. MidniteSolar tech support has been super easy to work with and helpful each time I’ve called with setup or configuration questions. At least two of their support personnel are actually using their products to live off-grid, and that makes it easy to work with them!
As it turns out, I probably could have done fine with the Tristar, too. Because our array is at a nearly-flat angle, it basically never operates at peak output. Since the Tristar was only barely shy of handling the peak output of the array, we could have used it and in the vast majority of cases, there would have been no practical difference. I’m still glad we got the MidniteSolar though; the extremely configurable parameters and two aux input/outputs were invaluable when we made the switch to DIY Lithium batteries.
The Classic Lite comes with an LED-display-only faceplate; you program the settings either with DIP switches behind the front cover, or by connecting with a laptop (can be done directly or via network). I used a laptop and the MidniteSolar local application to set up ours. For this purpose, I have an Ethernet cable accessible from our bathroom.
I had felt the laptop interface would be easier to use than the display panel, but in reality connecting to the charge controller is a little finicky, and without a full-time display there’s no way to quickly check the controller’s status. I’ve since had a chance to install the Classic display module (MNGP) with our controller and it’s really easy to use. We saved money getting a Classic Lite instead of a regular Classic, but really should have spent the extra for a non-Lite. So far, things are working well enough that I don’t think about keeping tabs on the Classic, but I don’t like not being able to.
I can’t believe I ever considered not using the remote display module. Being able to check on the performance of the charge controller throughout the day is not only enjoyable, but crucial for some troubleshooting work. With our recent addition of the Whizbang, Jr. module to the Classic, I now have battery monitor – type features on the remote display as well. Regardless of the charge controller you use, having a display for it in the living space is well worth it.
I see that HandyBob is no longer a fan of MidniteSolar charge controllers after some recent bad experiences. Although I haven’t yet seen the screen glitch or equalization issues he describes, and have gotten good support so far, I am definitely underwhelmed with the ‘turbo’ fan. It appears to be a hasty add-on, and I can definitely see how it could get loose and be loud, because of how the housing is assembled. Ours has been pretty quiet so far, but who knows? If it gets loud, we'll know right away, since it's so close to our living area.
Ours did in fact get loose. Actually what happened is the charge controller itself had to be replaced under warranty. The replacement-exchange went smoothly but the ‘turbo’ fan on the new unit made a racket! I swapped it out with the one from our original charger before returning it, to avoid adding that buzz to our daily lives. I’m always worried that one day it will start rattling away in our basement. Even without the turbo fan, the Classic can get loud under a heavy load. Usually it’s not enough to bother us, and usually it’s drowned out by the inverter’s fan noise…but if silent operation is important, the Classic may not be ideal.
Batteries (Interstate GC2-XHD)
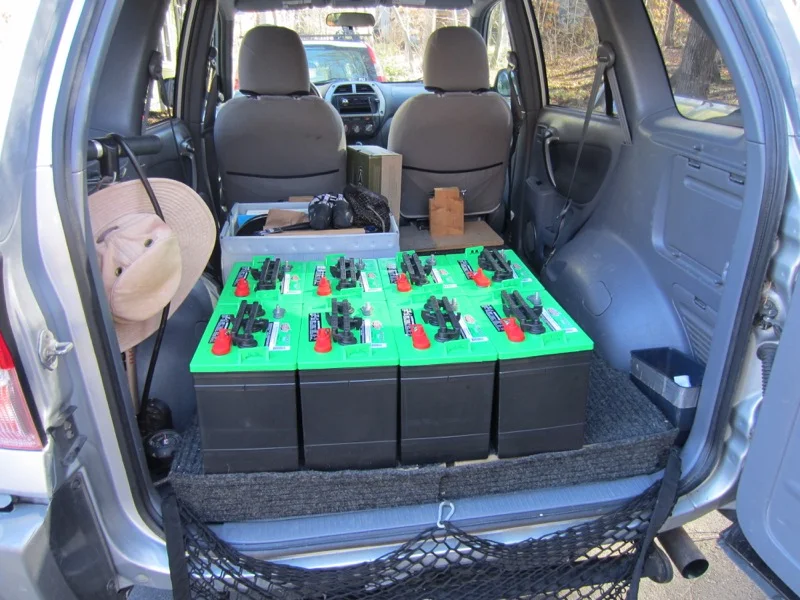


“Golf Cart” batteries have been a staple of solar and off-grid living for a while, and it’s because of their cost. The technology is almost as old as batteries themselves, but it works. We got ours from a local Interstate battery shop – they had them right on the shelf. Worst part about buying these was having to pay the core charge – normally when you buy a battery (say, for your car), you get a core credit for your old one applied to the new. Of course we didn’t have 8 batteries lying around to trade in, so we had to pay that.
The batteries are 6V each, 232Ah capacity flooded lead-acid type. The bank is wired with 4 parallel strings of 2 batteries in series, yielding 928 Ah @12V. This does not follow the “One Ah for each Watt of PV” rule, and that’s okay for us – not that we have much choice. Even if we were willing to give up more space to additional batteries, access would be much harder, cable runs would be longer, and we’d have to upgrade the trailer axles or live in a nearly-empty trailer: At 65 lbs. each, this bank adds 520 lbs. to the trailer, which is already a huge issue for us.
Wiring the batteries the way I did was not a great idea. This configuration is referred to as “2s4p” and it has the major liability that all currents drawn from the bank get split 4 ways – about ¼ of the current passes through each of the four 2-battery strings. The trouble is that it’s not exactly ¼ of the current. Due to small variations in resistance, each battery sees a little different current – which means each one gets discharged to a slightly different degree. Over time, this leads to substantial imbalance between the cells and results in shortened life. Add in the 200+A loads we were powering with our big fat inverter, and it basically amounts to battery abuse. Which thankfully is not illegal…but it’s still not a good idea. There’s better ways to build a battery bank…but I won’t go into that detail here.
These batteries will require watering eventually (so far, they haven’t lost any electrolyte though), and that will be a bit of a pain, in the short compartment we made for them. The biggest bummer is the max depth of discharge – 50%. Even though they are “deep-cycle” batteries, if we take them below 50% we’ll start to cut into their lifespan and performance. So our effective bank capacity is really only 464 Ah.
I also evaluated L16 type, forklift (“traction”), AGM, and Lithium polymer type batteries for the Toaster. The short answer, if cost is any concern...you’re going to end up with golf cart batteries. I read that a dozen times myself and still didn’t believe it – I thought we’d be somehow special or different – but the alternatives are just too expensive: We got a good price on our batteries and paid $1100 for all of them. An AGM set would have cost nearly $3000, and taken up the same amount of space, while only reducing weight by 10% (but would have been maintenance-free). Larger lead-acid batteries (forklift, L16) were just the wrong shape to fit into our available basement space (either too tall or too long). A Lithium-polymer bank would have been at least $4000 (probably more like $6000) – but would have only taken up half the space and weighed a third as much as the golf-cart batteries do! Li-Po batteries are definitely a great technology and in cutting-edge applications would be totally be worth their cost. If the price of those ever comes down, we’ll be keen to upgrade.
The weight of our battery bank is a central issue for us. Even though we removed a fair bit of mass from the trailer in the renovation, it still weighs more when empty than it did before. This means we have to think carefully about every item we bring, and pay just as much attention to where we put it – a lot of our heavy stuff has to ride in the truck – or else we’ll exceed the Toaster’s axle ratings.
Well, I’ve learned a hell of lot about batteries since writing this post. The best advice I ever got about DIY solar was to start with a cheap set of batteries. That’s what we did, and boy am I glad. It turns out, no matter how much you read and study and calculate, no matter how careful and diligent you are, you’re basically guaranteed to cook your first set of batteries. It’s just too much to take on without making some kind of mistake.
We got about 18 months out of the Interstate batteries, and considering they only have a 1 year warranty, that’s pretty respectable. Considering that we were hammering them with frequent, sustained heavy loads, and probably over-discharging them due to some setup errors on my part, I’m impressed with how durable they were. Lead-acid chemistry batteries are tough and for that reason I strongly recommend them as a first battery set to everybody. There’s actually quite a lot to think about when choosing batteries; too much to get into here. But I’ll say this: there’s a good fit out there for just about any budget, if you understand the trade-offs.
That said, when it was time to replace our first set of batteries, we ended up choosing to build a DIY LiFePO4 (LFP) pack. This involved a substantial upgrade to our controls and systems around the batteries, as well as a LOT of reading and learning and swearing and panicking. We had our reasons, and it’s working out well for us so far, but I strongly advise against LFP for beginners.
Inverter (Magnum Energy MS-2812)
Magnum Inverters have an awesome reputation, and I can see why. They’re robust as hell. Design, documentation, and quality are solid and impressive. Support is very competent and helpful. I read the manual, bolted it down (well, actually, up), connected cables, set the parameters, and hit “start”. That was the last time I touched it. Looooove that! I also was grateful for the many ways Magnum permits you to orient the inverter, since well-positioned terminals can be a big help in shortening cable runs. Ours is upside-down and runs with no issues. Do make sure you heed required air-space around the unit, as it gets very warm! When our inverter runs a lot, the floor just in front of the toilet gets noticeably warmer -- warm feet while using the john...what a luxury!
The 2812s are the largest 12V inverters Magnum makes…and bigger than we need. It is a pure-sine inverter, which means the power it makes is as clean (if not cleaner) than what comes from the electric utility. This is important if you want to run sensitive electronics, modern digital displays, or anything with an AC motor. We’ve only really got the latter to worry about, but wanted to be careful with our stuff. AC motors can either fail outright or work very badly on dirty power, so a modified sinewave inverter – though cheaper – was not an option. By this point, we knew we’d want to run a residential fridge, which uses a AC compressor motor. Plus there’s typical household fans, heaters, power tools, kitchen appliances, and maybe a portable air conditioner (we dream aggressively) -- in the future. As with most inverters on the market, this inverter can also charge the batteries from shore power, though at the time of writing we've only done that 3 times. Ever ; )
The trick with choosing an inverter is having just enough Watts to run everything you need to run at once, but not such a high Wattage that most of your usage is only a small percent of the capacity. If the inverter is too small, you have to always turn one appliance off before turning on another (and when you forget, go outside and reset the breaker). If it’s too big, you can run everything you want but the efficiency will be low, wasting precious battery energy. We were really unsure what our usage would look like, so we chose to go big on Watts. After a couple months of living in the Toaster it’s clear we could have done with less. Of course, it’s really nice to have all that capacity – we can cook on the electric range, use the toaster, plus a hot water pot, and not have to worry if the fridge compressor will kick on unexpectedly. But that's only mealtime -- most of the day, the only AC appliance running is the fridge cycling intermittently, which tops out around 100W – well under the inverter’s rating. So we’re not using our battery energy as efficiently as we should, which is a bummer.
The biggest reason for the oversized inverter is the water heaters. Each one has a 1500W element, so already both can’t be on at the same time (this is handled by a slick relay arrangement). In normal use they will only cycle on briefly now and then, but we didn’t really know how much of that to expect, or if that would overload the inverter if the fridge also happened to be on. We now know this would not exceed 2000W with the fridge, so the next size inverter down would have probably been ok, only requiring a little more careful use of our appliances. At least the inverter won’t be an obstacle when we move to get rid of the propane oven and become 100% propane-free!
We did in fact get rid of the propane oven and have been entirely propane free for over two years now. The inverter handles these loads well, although in some cases we do still have to manage what we turn on at the same time. I have learned something very important about inverters though: Just because someone makes a 12V, 2800W inverter, doesn’t mean it’s a good idea to use one. At just 2000W, our inverter draws nearly 200A from our battery bank. This means big, beefy cables, a big, beefy breaker, and it’s pretty hard on lead-acid batteries to draw that much current. For a robust system, once your inverter gets to 2000W you really need to be looking at a 24V battery bank.
Magnum has a nicely integrated line of accessories, including the ME-RC remote control/display unit. This was a cinch to install; it even came with a super-long 50’ Ethernet cord so we just had to route that from the inverter to our control panel area (and find a spot for the excess). This display is used to program and control all of the inverter/charger functions, and has a few extra meters built in to help manage your system. The one we mostly use is the SOC (State of Charge) for the battery bank. It is not the most accurate measure of battery state, but it’s fine for our daily use. The one piece of advice from HandyBob that I didn’t follow was not getting a Trimetric meter. Reviewing the documentation for it, it was clear to me that the Trimetric gives great information. But frankly, I didn’t intend to keep such careful tabs on my system. I know that’s cavalier, but I’d rather ride my bike than crunch solar data. I’m sure the day will come that I wish I had one – which is why we pre-wired the control panel cabinet for it – but at the moment I’m not missing it.
The Trimetric did end up happening, after about a year on the road. Living entirely on solar means paying a lot of attention to your system, and I’ve learned that having more than one meter available can dramatically improve troubleshooting and understanding capability. The Trimetric didn’t cost a lot to add, and it gave us some convenient redundant measurements. It also lets us have each meter set to a different value, so I can monitor multiple quantities at once. Recently the ME-BMK module on our inverter gave up the ghost, which would have meant we lost battery SOC% measurement. But the Trimetric was already tracking that redundantly for us, so there ended up being no crisis. Redundancy on critical systems ain’t a bad idea.
Disconnect panel (MidniteSolar MNDC)
All these goodies have to actually connect to each other, and that’s what the DC disconnect panel is for. Although this can be done with residential-type equipment from the hardware store, that stuff is almost always far too large, very heavy, and the capacities don’t match up well with solar stuff. I tried to make that work for weeks before giving in and spec’ing the MidniteSolar equipment. The MNDC box is big enough for our system (with maybe a little space to spare). It’s compact, aluminum construction, and just barely fits into the ‘basement’ of the Toaster. This box holds all the major system breakers, which protect the wiring from over-current faults (thereby avoiding electrical fire). The breakers can also be used to isolate devices from the system, either for troubleshooting, maintenance, or full system shutdown for storage. MidniteSolar also sells the breakers to go in this box. Space is tight; working inside the box requires patience and iron knuckles. But once it’s done, it’s clean and compact. I used 4 DIN-rail-mount breakers along the top to supply DC power from the batteries to the DC distribution panel, isolate the two strings of solar panels from the charge controller, and isolate the charge controller from the batteries. The big one on bottom is 250A, supplying the inverter from the batteries.
MNDC dc disconnect box and magnum inverter, cabled up.
You may have noticed in the earlier picture that our breakers are all installed so that “ON” is down (opposite of convention). The breakers are right-side-up in the MNDC box, but the whole MNDC is actually upside-down! It was the only way to make it fit in the tiny space I left for it. We needed the breakers to be on the left side, and although MidniteSolar offers both left- and right- side hinges, the breakers are on the right regardless! I tried installing them upside-down in the box to compensate, but the shape of the large inverter breaker made that impossible. I did call and verify that the breakers will not be de-rated if installed this way. So long as they are vertical, they are OK.
I was not prepared for the ardor of cable sizing. For safety and efficient operation, conductors between devices have to be properly sized. With so many high-current DC devices, voltage drop along cable runs is a major factor, and can really kill a system. Some devices will list their own minimum requirements in the manual, but if you can go larger, it’s worth it – and if your runs are long, it’s mandatory. I added another tab to the spreadsheet for this, to make sure I didn’t undersize a conductor. It was hair-tearing work, getting all that information into one place.
One nice thing about putting solar into an RV is your cable runs tend to be pretty short to start with, but you should still put effort into minimizing them. Before we rebuilt the Toaster, the electrical equipment was a joke. I don’t think it was even possible for the charger (from shore power) to get the battery up to full charge, on account of voltage drop! Now, our charge controller is 4” from the battery bank. We have 8' of round-trip cable between the inverter and the batteries, and it’s connected with 4/0 welding cable (that’s the minimum per the inverter manual). Finding 4/0 cable wasn’t terribly hard (welding shop), but finding a way to put the terminals onto it was: Weld shops generally use hammer-on types of terminals…that’s fine for a welder but not for solar! Hunt until you can find a proper crimp-type tool. They can be rented online…at no trivial cost. Buying one rarely makes sense. I tried welding shops, gas supply houses, rigging shops, and the only local store I found that could even get the terminals for me was Fastenal – but I was still on my own to figure out how to crimp them. I eventually was able to borrow the tool from a local electrical equipment manufacturing factory, through a friend.
So, that covers the "solar" side of our trailer -- how we make the electricity. In Electrical System Design - Part 2, I talk about the "load" side of the system, and how we actually use that power. An off-grid lifestyle requires paying attention to both the supply and demand aspects of electrical usage, but it doesn't mean you can't live comfortably!

