One Month+ On The Road: Fails
Disclosure: This post contains affiliate links. Please read our full disclaimer.
Below is a list of things that have gone wrong during our first month on the road. This isn’t a sob list. Rather it’s to share with you that life on the road isn’t perfect – there are days when we feel like all we do is fix thing (and that’s actually what we did). There’s a large learning curve to living in an RV, and this list shows that we are newbies. We hope this list will help prevent any of these mistakes happening to you.
- With our Air Head toilet being brand new to us, we made a few mistakes with it. The first mistake we made is that we overfilled the liquid tank because we didn’t pay close enough attention to the liquid tank window to see how full it was getting.
Tip: The window on the tank only shows when it's almost full, and if your bathroom is a bit dark like ours it's hard to tell where the level is if it's not at the window. So grab your headlamp/flashlight and shine it up against the window. The light will illuminate the tank and you’ll be able to see clearly how full the tank is. We try to remember to empty it every three days max (with two people using it full time). We set repeating reminders on *both* phones to keep us on top of it.
- The second mistake we made is that we somehow didn’t follow the Air Head directions on how to prepare the peat mix in the composting toilet. Our start up had WAY too much water. We also didn’t keep the bathroom (or the rest of the rig) warm enough to prevent the bacteria from going dormant (We weren’t expecting 20 degree weather and a foot of snow; interior temps went into the 50s). These mistakes caused our outside toilet vent to smell like poop because it wasn't composting. We called Geoff, Air Head owner, and asked for help (he was extremely friendly and eager to help) – which is how we came to understand our errors.
Tip: It's all about following what the manual says: Fill the solids tank to halfway with barely-hydrated coco pith. The coco block that comes with the toilet should be the right amount to get started, but take your time when hydrating it and filling the toilet the first time. Prepare the whole brick as directed and then fill the solids tank and check the level. If you use too much water you'll get a too-full toilet that never dries out and won't compost correctly. Take the time to get familiar so when you are re-filling with a new brick you know what to expect. Coco bricks vary in size and density so your replacement brick might not act quite like the original one did. Remember: A correctly-filled composting toilet does not stink. So if you smell poo, it's time to figure out what you did wrong : )
This block of coco pith is swimming in too much water.
- The initial couple of weeks of living in the RV we didn’t put water in our fresh water tank in fear of the pipes freezing. But we still used our sinks with canteen water, which drains to our gray water tanks. When the temperatures dropped below freezing, we didn’t account for the fact that the gray water tanks fill from the dump valve up and our dump valve is not insulated. When the temperature dropped below freezing the water in the dump valve froze and cracked one of the gray water lines connecting to the dump valve.
Tip: If you are not able to insulate your dump valve then leave the valve open and the gray water emptying into a bucket. After this incident, we bought a pipe freeze proofing kit (Reflectix and pipe heating cable).
- Once we did filled our fresh water tank it was a mess! After filling our fresh water tank and starting the water pump we realized that one of the pipes on the bathroom water heater was never reconnected after we winterized the RV. This caused water to leak out into the bathroom sink cabinet and all over the basement of the RV. After we fixed that we tried again, only to walk back in the RV to find the water spraying from the showerhead straight out of the shower (we also had the wooden platform in the shower so water couldn’t drain). Turns out we also forgot to turn off the knobs for the shower and the bathroom sink.
Tip: Don’t be a dummy like us and remember what you did when you winterized your RV or reconnect pipes you’ve taken apart and make sure your faucet knobs are all on the off setting.
- One night while in Salida, CO the temperature dropped down to 20 degrees. We weren’t expecting the low to be that low. It had snowed on and off the previous day and continued overnight. We woke up to a foot of snow and frozen kitchen water pipes. It was because of incidents like this that we learned where the weak spots are in the RV. The kitchen water pipes have the least amount of insulation to protect them from the cold and we didn’t run the heater in the main room – only in the bedroom where we were. Luckily we didn’t burst the pipes.
Tip: Spring in the Rockies is volatile. We became complacent with the weather because the previous week was in the high 60s during the day and the high 30s at night. Be prepared for the weather to get below freezing during spring even if it’s hot and sunny just the day before.
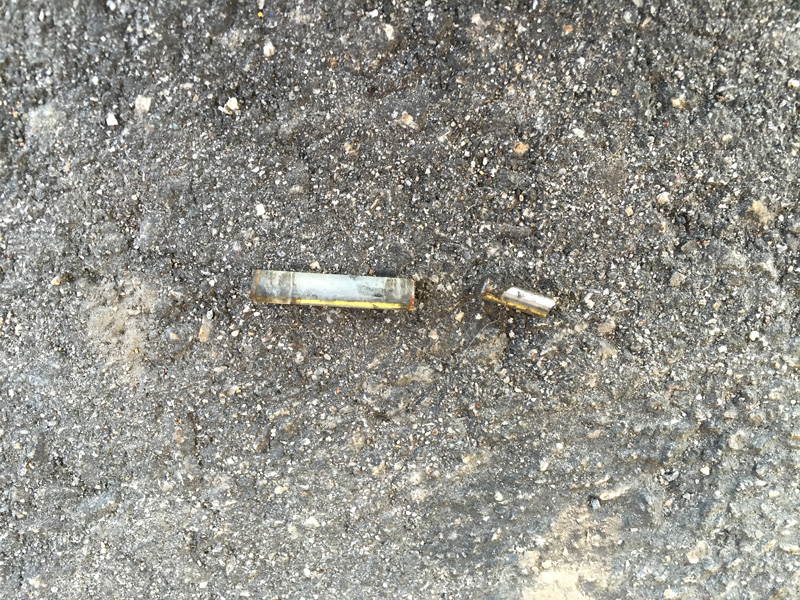
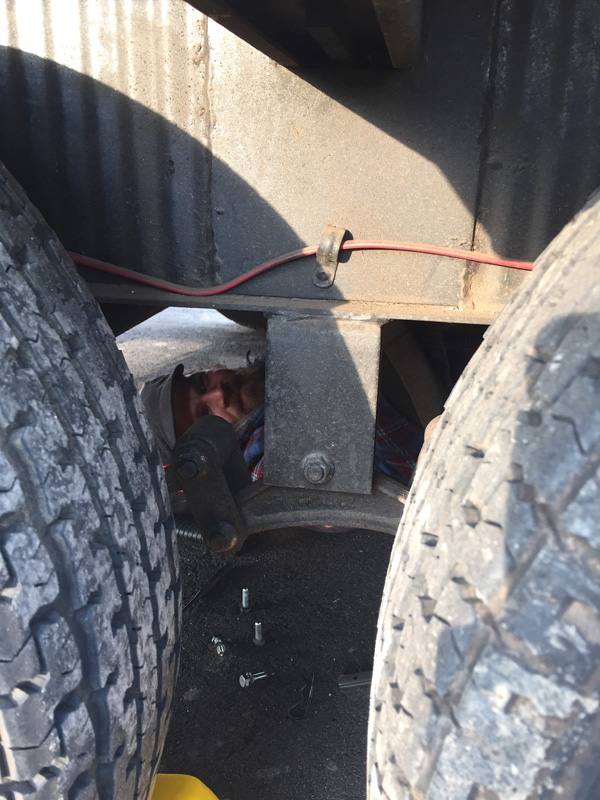
- On the day of our one-month anniversary of living on the road, our RV slide broke. After parking the RV for a one-night stay in Walmart, we unhitched the trailer from the truck and tried to open the slide. We could hear the slide motor move, but the slide didn’t. Turned out the pin that holds the slide to the motor sheared in half. A biggest bummer was that we had invited friends over for dinner and if the slide doesn’t open that means we can’t have 5 people in the RV. There is a manual crank that bypasses the slide motor to open the slide in case of motor failure. But the broken pin made the manual crank unusable. Jerud removed the entire drive assembly where the pin was and we physically pulled the slide out.
Tip: Sorry but there’s not really a tip for this. From Googling online it seems like this is a major weak point in older model RV slides and they tend to break. New slide designs may be more reliable. Tip would be to learn how to fix it yourself so you save yourself a lot of money from bringing it to an RV repair shop. We now have extra pins on hand in case this happens again (it’s happened again once since the first incident).
- The only paid campsite that we’ve stayed at so far was at Great Sand Dunes National Park. And it was there that we broke off our dump valve assembly. A lot of the spots at Pinon Flats campground in the park were too small for our truck and RV. We finally managed to find a site that would fit us and it was paralleled to the road. We are so used to focusing on low overhanging tree limbs that might be in the way of our solar panels that we totally didn’t pay attention to the tire area of the RV. Our dump valve assembly stuck out beyond the tires (original valve assembly) and when we pulled into the campsite there was a rock wall corner that stuck out further and that was what caught and ripped off our dump valve assembly. This caused us to use a 3-gallon bucket as our gray water tank until we fixed this.
Tip: Watch for obstructions high and low. When we repaired the valve we shifted it inboard more to prevent future incidents like this. The upside of this incident is that we were able to repair the cracked gray water line (from previous fail) at the same time.
This isn't our complete list of fails, but it gives you an idea of the things that go wrong living in an RV. Better luck to you!
We're curious to hear about your fails, it may help us (and other readers) prevent it from happening.