
Battery Issues - Fall 2015
Disclosure: This post contains affiliate links. Please read our full disclaimer.
The Toaster wasn’t quite finished when we hit the road. But one thing that (thankfully) worked from the beginning was our solar equipment. Recently we had to troubleshoot an issue with the batteries though, and I’d like to share how that went because we made a bunch of mistakes and thought perhaps others could learn from them. I’ve never had to work my way through a battery issue, and while I did find a lot of helpful info online (the Northern Arizona Wind & Sun forum was very nice), I didn’t find many real-life examples, which are usually the most helpful for me to learn from.
When we started travelling, we already had a huge list of projects to finish. As the days passed and we dealt with the seemingly endless work, we began to take our solar equipment for granted because it was working, dammit, and nothing else seemed to be. Eventually, we found ourselves parked for a pretty long time in Seattle. The Toaster quietly charged its batteries and kept our fridge running and the lights on. We watched the battery state-of-charge (SOC) meter to ensure it never got too low, and it never did. Good Toaster.
Then the weather started to turn. It was Seattle, you know? After many days of overcast and rain, we were seeing SOCs in the low 60’s, and more rain in the forecast. Remember that lead-acid batteries should not be discharged below 50%. The day before we were ready to leave Seattle, our inverter turned itself off due to low battery (per our settings), when the bank hit 49% SOC. We had never discharged our batteries this low before. We immediately moved it, to plug it in, and protect the batteries from damage. We thought it’d be a good idea to go ahead and water the batteries while we were at it, so they knew we still loved them. If you'd like a reminder about the science of why batteries need watering (i know i did), the Wikipedia article is pretty understandable.
We eagerly headed away from Seattle to get back to dry camping. We departed with batteries showing 99%, but quickly noticed they were depleting much faster than before. We have never kept a log or a close eye on usage, but rarely lost more than 10% per day in mild weather. Yet, we awoke after our first night with an SOC of 74%. We wrote it off as a glitch, but after 5 days of fighting to keep our batteries charged, we finally accepted that our problem was real (Stubborn? Us?). We set our sights on an affordable RV park, so we could take the batteries offline for whatever work was coming. We have learned to assume the worst.
The view into a battery cap. See the lead plates in there?
After a little online research, I realized our mistake #1: We watered the batteries when they were well below fully-charged. Upon recharging them, we could have lost excess water and ended up with too little. This really shouldn’t have caused the particular issue we were seeing, but it was a clear mistake so we started by trying to fix it. We brought the bank up to 100% and I checked the water levels again, expecting them to be low. They were fine, which makes sense, because batteries only lose water during overcharging, and we hadn't had enough sun to get a full charge for weeks. But this exercise still paid off because when checking the water levels, I didn’t have to take the caps off battery #4…they were already off. Shit. I must have never replaced them after watering back in Seattle! I remember that was the last battery we watered, and it’s a tough reach, so I can totally see myself forgetting to replace them. Driving around with the caps off allowed electrolyte to splash out as we drove, and also during charging. Mistake #2 was doing battery maintenance in a hurry and not double-checking our work!
Top of battery with fill caps in place.
Caps off, ready for filling. This is how i left battery #4.
Luckily, the tops of the plates inside battery #4 were still submerged, so it seemed like it probably hadn't been ruined. I was afraid to add more water: When you splash out electrolyte, you are losing acid, not just water. Adding more water, I feared, would end up diluting the acid in the whole battery. I thought we’d have to replenish the lost liquid with acid – not exactly out of the question, but I wasn’t excited about trying to safely measure out and pour that stuff. So I only replaced the caps, and washed off the top of the battery to remove any acid laying around up there. It was solidly overcast so I didn’t have to worry about further damage caused by solar charging. At this point, I realized what my biggest mistake of them all had been. Mistake #3: gauge-laziness. Gauge lazy is when you are staring at all your gauges trying to figure out a problem, but never actually go look at your damn equipment with your eyeballs. I should have done that on the first day.
Now that I was good and angry at myself, I compensated by going completely nuts testing the batteries. I grabbed my mirror, light, multimeter, and hydrometer, and measured everything I could think of. This was the first smart thing I did. I disconnected everything from the bank at the breakers and let it rest for an hour. Then I got voltages for the whole bank, and each individual battery. I re-checked water levels on each one, and measured the specific gravity in all 3 cells of each battery – 24 places total.
Specific Gravity

The voltage of a battery correlates roughly to its state-of-charge. This is how basic battery charge meters – probably every meter most of us have ever seen – work, including the ones on RVs. If the dial reads out in something like ‘green’, ‘yellow’, and ‘red’, that’s what it is. Trouble is, there are a lot of other factors that also influence battery voltage, and consequently these gauges are, at best, approximations. This is especially true of larger systems with many different loads, controls, and charging sources, such as off-grid installations…and definitely RVs. Yes, RV owners, you already knew your grey- and black-water level gauges were useless, now I’m telling you your battery gauge is, too. Sorry. That entire gadget on your wall is basically a big “fuck you” from the RV manufacturers.
High-quality battery management systems, like the Trimetric 2030-RV and the Magnum ME-RC remote (we use this to control our inverter and for SOC, but it’s not as good as a Trimetric) can do a much better job. They figure out when your batteries are 100% full by monitoring the charge cycle, and from that reference point they track how much electricity you use, and how much you add back by charging. By adding and subtracting, they know how full your batteries are. But this isn’t a direct measurement; it’s history-based tracking. You can’t just walk up to some random battery and ascertain its SOC using this method.

Magnum ME-RC remote

Someone else's Trimetric...shame on me
Some folks look down on wet-cell batteries as being low-tech and heavy (well okay, yeah they are), but one awesome advantage they have over other battery types is that you can access their guts. The best way to know a battery’s state-of-charge is to measure the concentration of the electrolyte inside it, which is only possible with unsealed lead-acid batteries. As they take on charge, the sulfuric acid inside gets stronger, up to a maximum that is specified by the manufacturer. A hydrometer draws electrolyte up into its chamber, where a system of floats or dials (designs vary) indicate the acid’s specific gravity (SG) – a measure of its density relative to pure water. Stronger acid is more dense. There is also some temperature correction that needs to be done, but many types of hydrometer have this built in.
Sucking acid out of a battery with a turkey baster sounds like the craziest way to check your batteries but dude, this is the science. Clearly, it’s inconvenient for daily monitoring of your batteries, but as a maintenance and diagnostic tool it’s invaluable. And hydrometers are cheap, too, so there’s really no excuse.
I was using an EZ-RED hydrometer, which is (supposedly) temperature-compensating and compact enough that I could get it into the cramped battery compartment of the Toaster. It was my first time using a hydrometer to test batteries and the only part of it that was hard was reaching into the battery compartment without blowing myself up. However, it has to be held level to read, which is tricky in our small battery box, and the dial reads out in increments that are both irregular and large – some markings are 0.025 apart, which is not good resolution when you consider that a difference between cells of 0.030 indicates a problem. Also, the scale has a large gap between the “good” and “fair” ranges, leaving the user to make a total guess about the reading. That is not science.

EZ-RED with package.

The EZ-RED scale isn't uniform.
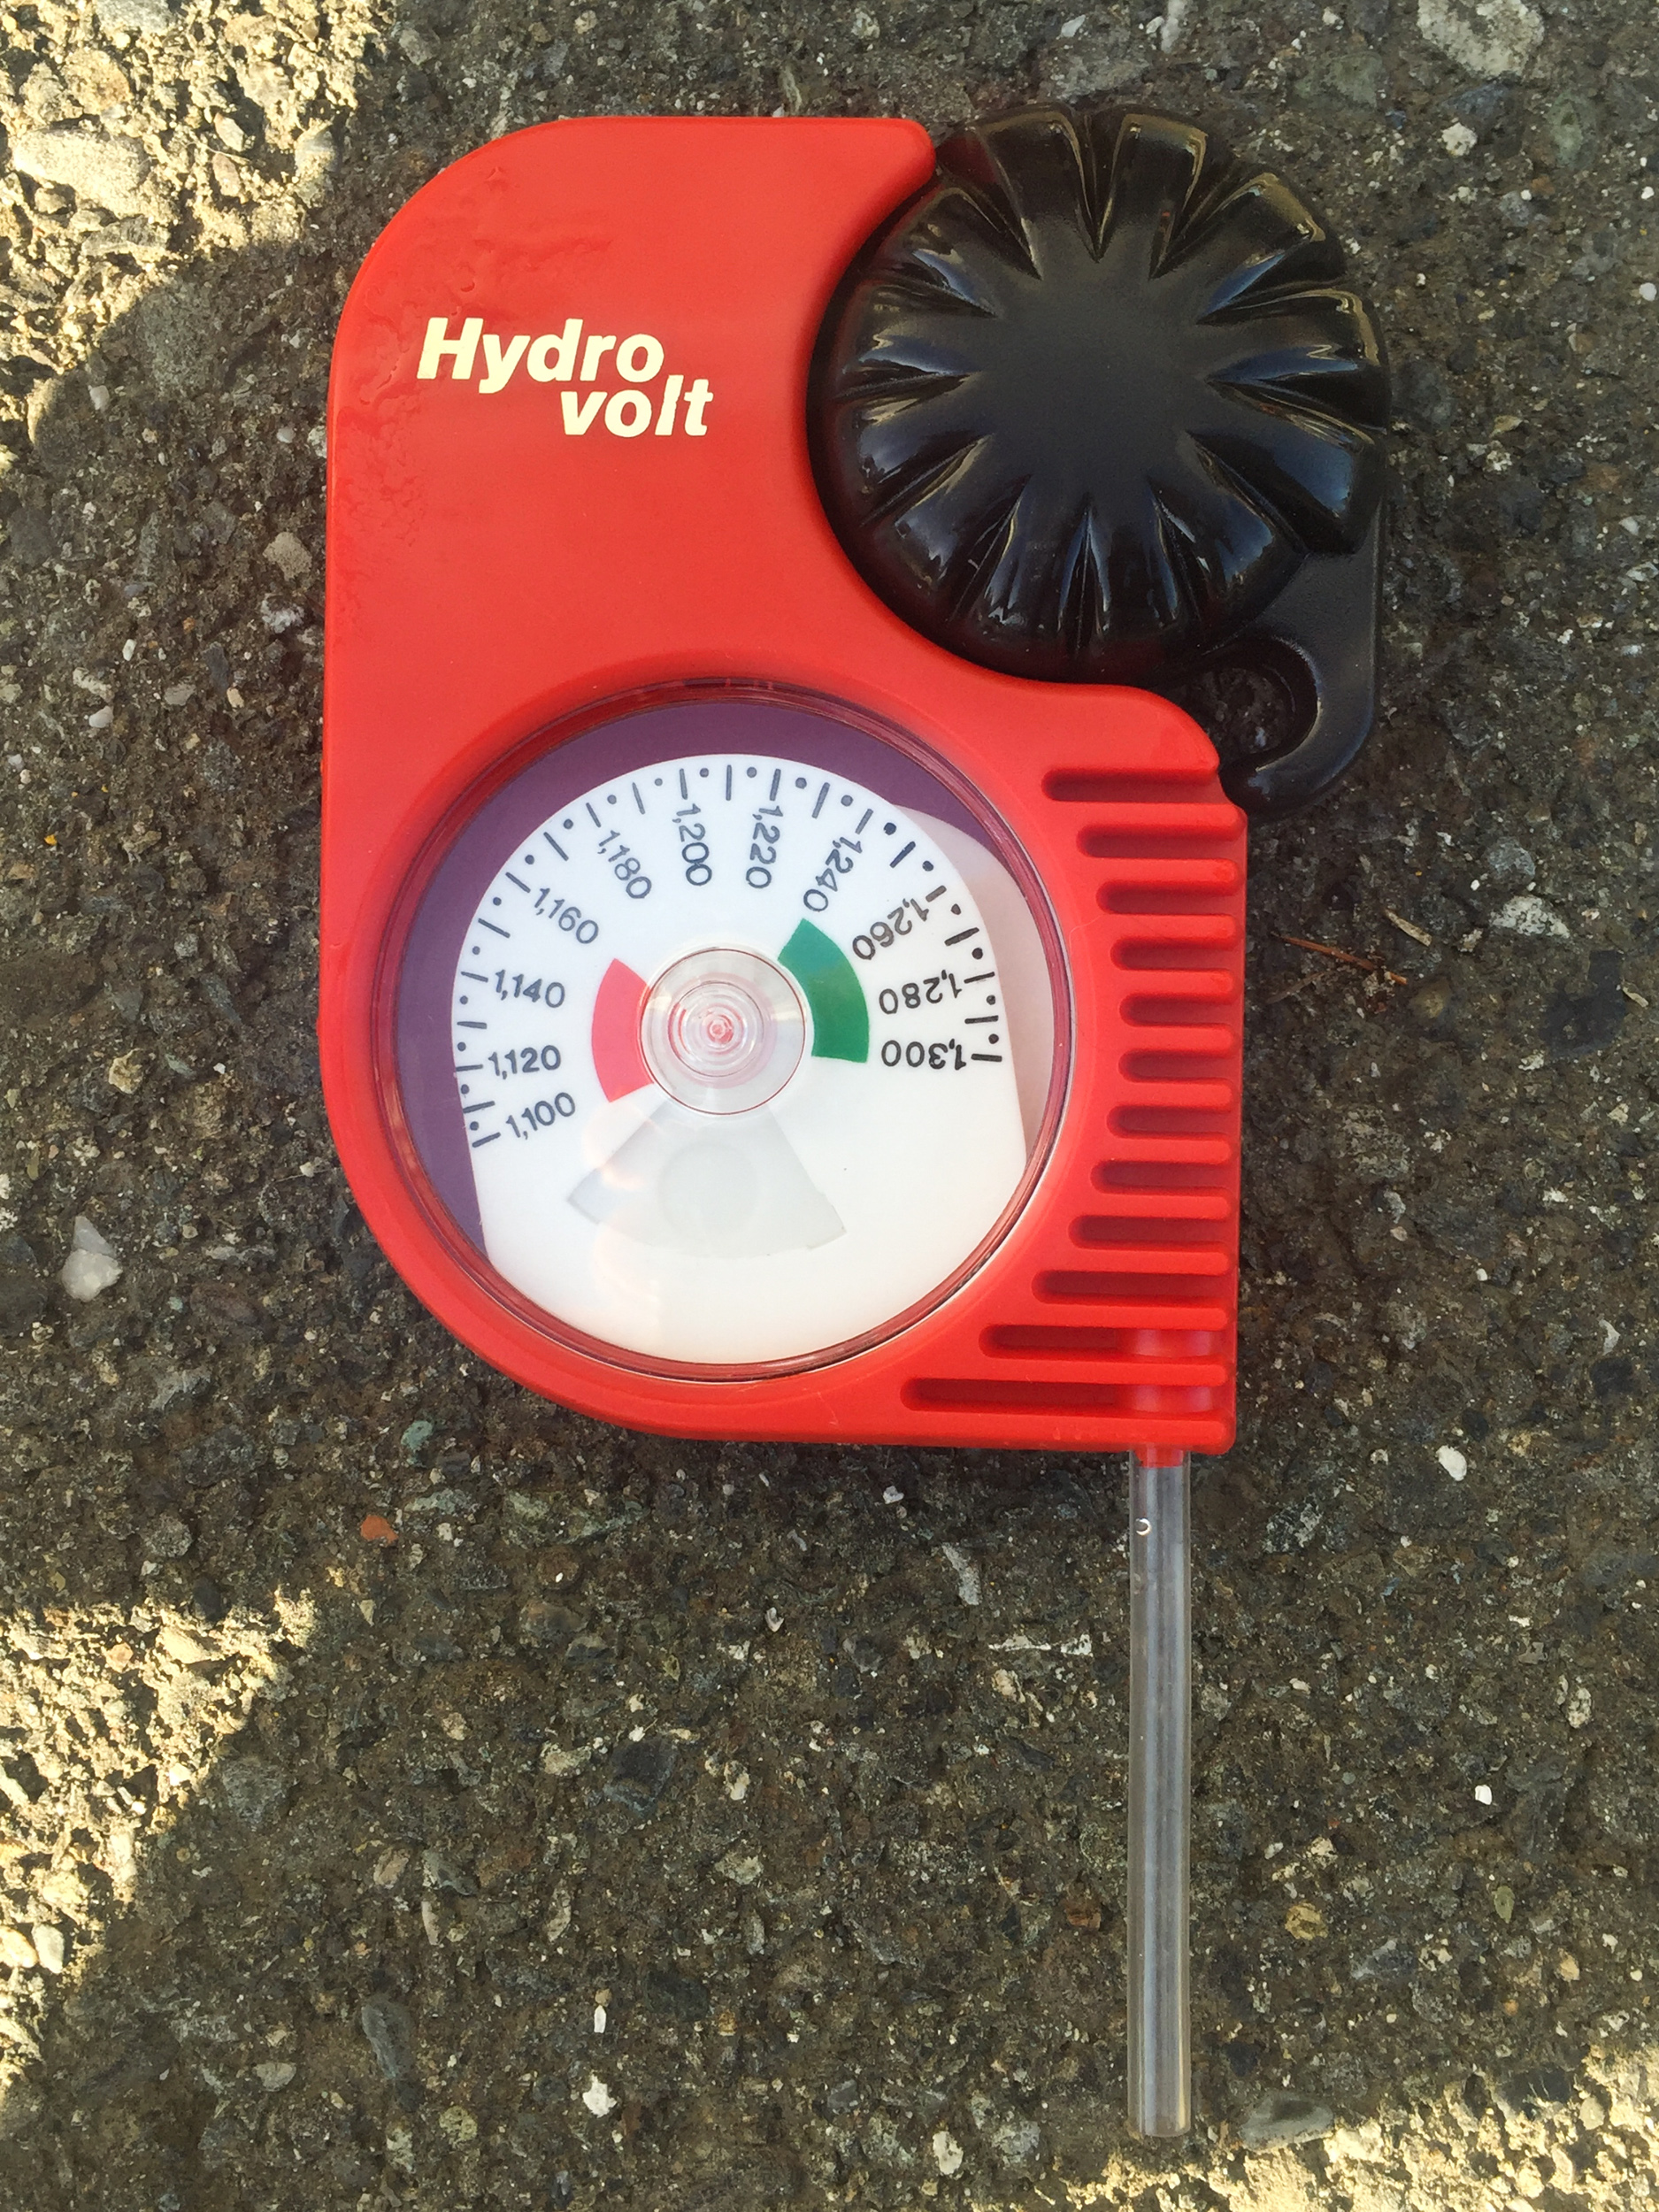
I like the Hydro-Volt better.
I ended up buying the Hydro-Volt hydrometer from NAWS and it is freaking awesome to use and totally worth the extra cost, especially in cramped spaces. It is not orientation-dependent, and has a uniform scale with 0.005 resolution. I think the EZ-RED is best maybe for someone managing a fleet of vehicles, who wants to see roughy how much life is left in their battery packs. The Hydro-volt is more flexible for general study of batteries.
I've made a little video comparing the two hydrometers here. Hopefully this can help clarify the finer points of using the two meters.
Here’s an example of hydrometer magic: Battery #4 (the one I left the caps off of) had a voltage that was exactly half of the whole-bank voltage (remember these are 6V batteries wired to make a 12V bank, so that is perfect). Its voltage was also the exact average of all 8 batteries’ individual voltages. Seems great. But its SG was 0.060 below all the other cells in the bank (this is bad). So this one battery was never getting really charged, and it was consequently dragging down the whole rest of an otherwise-healthy bank.
How Do We Fix This Now?
We made our way to an RV park outside Portland so we could get this solved. I knew whatever happened, we would at minimum need ample electricity (forecast was lots more rain, so we couldn’t get that from solar), possibly battery acid, and worst-case, a replacement battery. Once we were nestled into our RV-park slot, I called up the local Interstate Battery shop.
Sidenote - Interstate Battery
Which battery brand to buy? This is something you really must research and decide for yourself. Figuring out where these things are actually made and who is putting their name on which ones (a lot of different brands come out of the same factory!) is confusing and frustrating. The gold standard seems to be Trojan, which I don’t question at all. I actually go to the Trojan site first when I’m looking for battery info. I’ve come across people claiming 10+ years of service out of Trojans.
We chose Interstate brand batteries for two reasons: I was able to get a discount on them through my employer, and I didn’t find anything online that definitively said they were awful. I thought there was a fair chance that, due to inexperience, we’d do some kind of damage to our batteries (looks like I was right about that) and I thought I’d rather “learn” on inexpensive ones. I’ve been impressed with their online documentation, their tech support, and the 2 different store branches I’ve dealt with (one on each coast) have been a lot more knowledgeable than I generally expect from local shops. Our batteries have been in service for about a year with no issues but of course that’s not long enough to draw conclusions about longevity.
Equalizing
The Interstate Battery store told me to add water and try to equalize the battery, and if the SG recovered, everything would be fine. If not…new battery. I then called Interstate tech support also, to be sure, and they told me the same thing. My concern about diluting the acid was unfounded, because apparently there was enough Hydrogen Sulphate bound up in the lead plates that a little extra could dissolve out into the added water and bring the concentration back up to normal. I was happy to hear I could skip the acid-handling!
I topped up battery #4 with water and initiated an equalize cycle on the Magnum inverter/charger. Equalizing is, from the Magnum Inverter/Charger manual, a “controlled overcharge”. The procedure is to apply a higher-than-normal-charging voltage to the battery (the battery manufacturer specifies what to use; 15.6V for us) while monitoring your battery temperatures, and measuring the SGs hourly. Battery temps must be kept below the manufacturer’s spec (115°F in our case), and they do get hot, but we didn’t have any trouble with ours during this process. You keep the voltage high and measure SGs every hour. When the SGs stop changing, the equalize cycle is done. Hopefully the new SG is close to 1.275 – if not…well then your batteries have lost some of their awesomeness.
Equalizing took about 8 hours before battery #4 stabilized at 1.250 which equates to a bit better than 90% SOC (the other batteries made it up to either 1.275 or 1.270). The guideline (per Trojan) is that all batteries should be within a 30 point spread (meaning within 0.030 SG), and this result is just barely within that requirement. It looks like we avoided doing major damage to battery #4, but our battery bank will probably never be quite the same. It’s a bummer, but it could have been far worse.
The Silver Lining
Through this experience, I became a lot more familiar with the various tools and measures of battery health and capacity. One bonus was finding the solution to another problem that I didn’t even know we had: a loose wire powering the battery monitor sensing unit (MS-BMKE). The MS-BMKE measures and transmits the battery usage data to our ME-RC display unit, which is what shows us our SOC. The loose wire was resulting in an abnormal low voltage that I noticed while trying to diagnose our battery issue, because I was scrolling through every menu I could find, looking for the problem. I normally would not have monitored that measurement, but when I came across an unknown voltage of 2.6V, I wondered what could possibly be intended to run at so low a voltage on a 12V system. Magnum tech support confirmed my suspicion: This was not a good number. I was able to find and secure the loose wire quickly based on that. This may or may not have been contributing to the errors in our SOC readings, but surely catching the problem now prevented the trouble of dealing with it in the future when it came completely loose.
Is It Really Fixed?
I’ve learned not to declare victory too soon…but it’s looking good. We woke up this morning at 96% SOC, which is in-line with our pre-watering-incident performance. We have acquired a Trimetric now, but haven’t installed it yet – once that is in, I’ll have more data and will be able to determine for sure how well everything is working. Based on what the ME-RC can show us though, things look pretty good.
It comes down to the same advice that we’ve all heard so many times before. Do your preventive maintenance on time. Don’t rush through your work. Don’t take shortcuts.
And if you take the cap off, put it back on, dummy.

